Label Assembly
The markers are the stainless-steel A-style Collector Series from Kincaid Plant Markers, and the detailed instructions of how to put together the label plates and wire stakes can be found on the manufacturer’s Assembly Instructions page.
This page contains additional information based on the GNGT webmaster’s experience of putting together over 500 labels for the Meadowlands Garden.

The recommended procedure involves these steps:
-
•To ensure proper adhesion, clean the label plates before applying the labels so that any leftover traces of machine oil from the manufacturing process are eliminated from the portion where the label will be applied. Isopropyl alcohol (91%) works fine for this purpose. It is best to clean several plates at a time; by the time the last one is clean, the first one will be dry.
-
•Be sure to orient the label plates so that the flange with the slot faces you, and the flange with two holes faces away from you. In this orientation you should see the label text in the readable orientation while applying the label to the plate. Correcting an upside-down label is difficult to do.
-
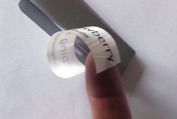
•Peel the backing off the label. There are two strips of backing, making it easy to peel them off one at a time. This may be somewhat tricky, since as soon as you peel off the second strip, the label will tend to curl onto itself; try not to let happen what is shown in the photo on the right. Do not let the sticky portions at the ends of the label to touch, as separating them will be difficult, and the label may get destroyed in the process.
-
•Hold the ends of the label and position it over the plate. Once properly aligned, press it down. Avoid the contact between the label and the plate until you are ready to press it down, as the label is quite sticky (it seems to stick better to the steel than to the fingers).
-
•Smooth out the creases and air pockets if any got created in the process (this sometimes happens until you get enough practice).